How to Draw a Mango for Kids Step by Step
I've been drawing and painting for most of my life and love sharing tutorials and tips to help anyone who wants to learn about art.

Learn how to draw a still life composition from start to finish.
carolynkaye
Still Life Drawing Tutorial
Learning to draw a still life composition is one of the most valuable, basic skills an artist can learn.
If you ever take a sketching or drawing class, still life drawing is usually taught within the first few sessions. Why? It teaches students techniques and skills that are the foundation for creating many types of artwork, whether it's pencil, colored pencil, charcoal drawings, pastels or paintings.
Still life drawing teaches you how to layout a group of various objects on a piece of paper, how to sketch assorted shapes and how to shade things so they have dimension and life.
It also shows you how to be aware of the way light, dark and shadows affect the objects you're sketching. Understanding this will help create realistic, life-like sketches and is a skill you'll need to know if you want to explore other mediums, like paints.
Another benefit of still life drawing is that it can be customized to a particular artist's skill level. Someone with little or no sketching experience can choose objects that are easier to draw, like round or oval-shaped fruits or vegetables. More advanced artists can make an arrangement of objects of any size, shape and detail level to challenge their wider set of skills.
So whether you've never sketched before, haven't sketched in a while or just want a refresher course in creating a still life composition from start to finish, follow the steps and pictures below to learn how to draw a still life composition.
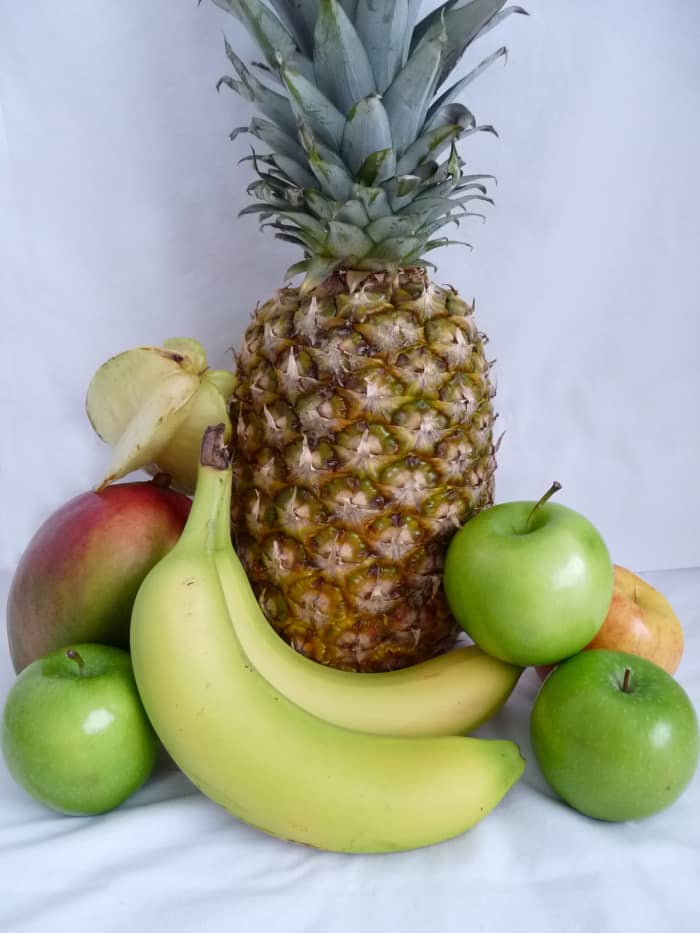
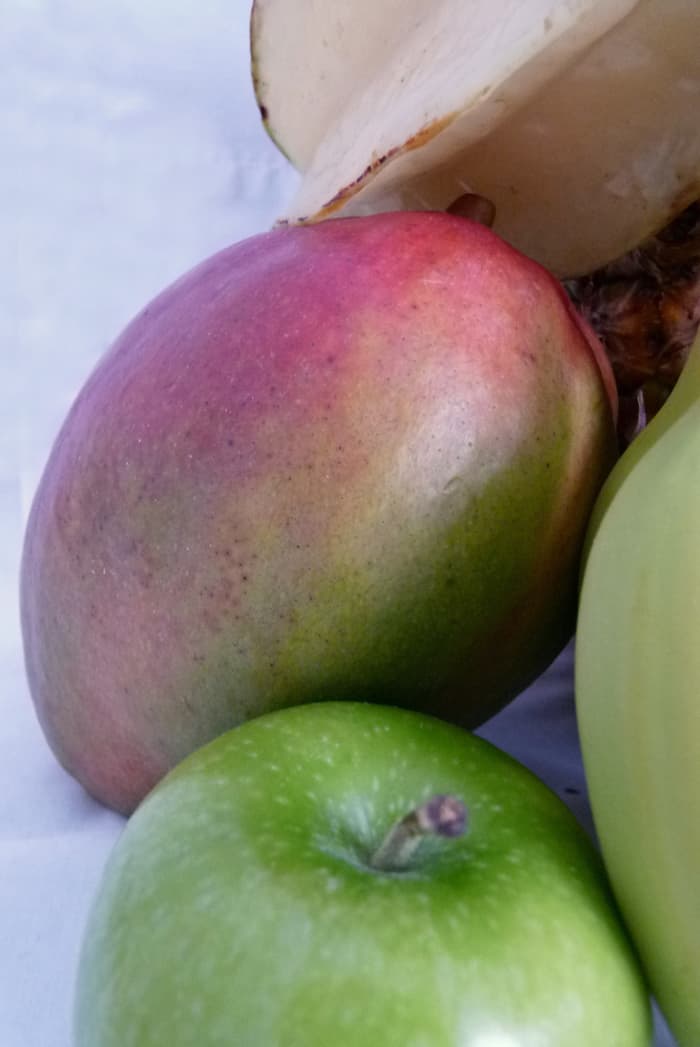
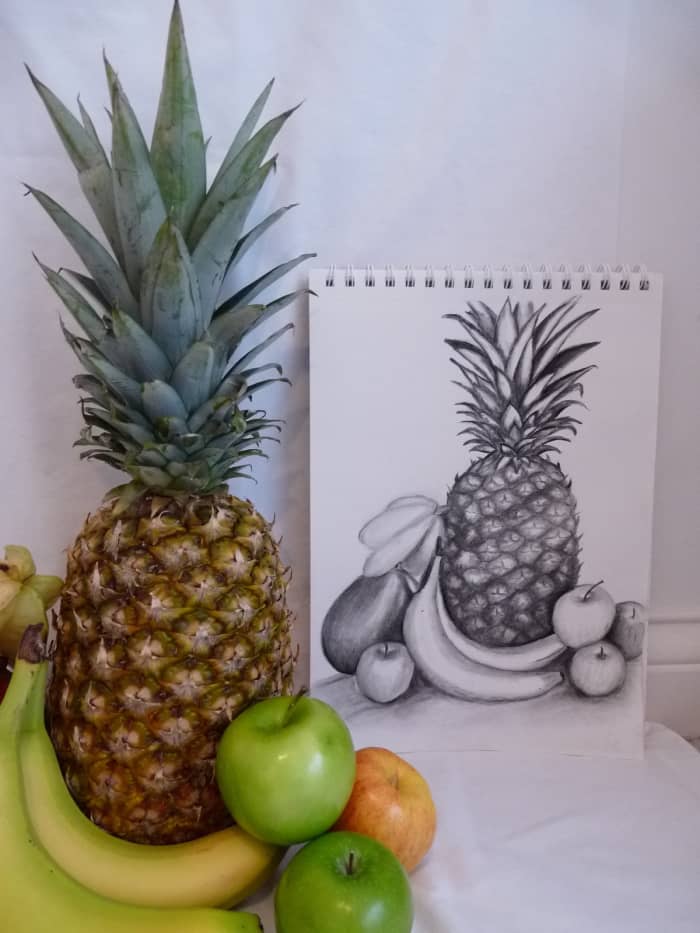
Fruit is a good subject for learning how to draw a still life composition.
carolynkaye
What to Draw?
For the sketch I'm demonstrating in this article, I chose fruit because it's one of the easiest things for beginning artists to draw. The pineapple and star fruit can be a little tricky for someone brand new to drawing, but you can leave out the fine detail and concentrate just on the shapes if necessary.
You can make an arrangement similar to mine or gather whatever objects you have around your home. You can create a theme or keep it totally random. It's up to you.
Just remember the more objects you use and the more fine details and textures they have, the more difficult the drawing. If you have little or no sketching experience, you might want to keep it as simple as possible.
How to Arrange Objects for a Still Life Drawing
Set up your objects on a flat surface near a comfortable place to sit for your sketch. A kitchen or dining room table is ideal for this. If you don't mind sitting on the floor, you can place the objects against a wall and sit in front of them.
Ideally, choose a place with some form of natural light or near a good lamp. If the area isn't well lit, it will make the drawing more difficult.
The light source doesn't have to shine directly on the center of your objects. Light coming from one side can make for an interesting sketch too.
Supplies You'll Need
- Sketch or drawing pad: It should be at least 11"x14". A larger pad allows you to sketch some objects true-to-size, which can be easier than trying to scale them down to fit your paper.
- Assortment of drawing pencils or charcoal pencils: You can buy these either individually or as a kit in art supply stores. You'll need a pencil sharpener too, if you don't already have one.
- Stumps and tortillons: These are sticks made of soft, felt-like paper that you'll use for the shading techniques shown in this article.
- Set of art erasers: A basic set of art erasers includes a gum eraser and a plastic eraser, which are less likely to damage paper. Plus, gum erasers can molded into any shape which makes it easier to fit in small areas. Erasers can also be used to add hi-lights to your sketch.
Read More From Feltmagnet
Optional:
- Spray fixative: When you're done with your sketch, a spray fixative can keep it from getting smudged and damaged. Krylon Workable Fixatif Spray is a good one for this purpose.
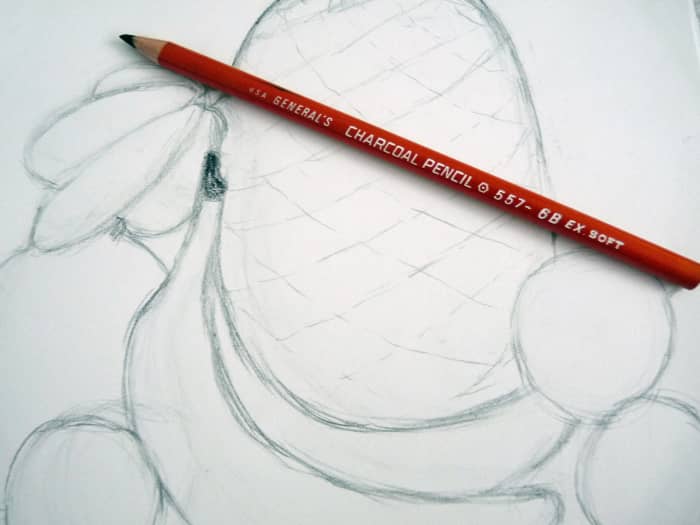
Step 1: Make a Rough Sketch
Use a B or 2B pencil to make a very rough sketch of your objects as you want them to appear on the page. Use light pressure with your pencil so that it's easy to erase things and move them around.
Don't worry if you need to turn to a new page and start over a few times.
Forget about all the fine details and shading in this stage.
Just sketch out all the basic shapes, centered nicely on your paper.
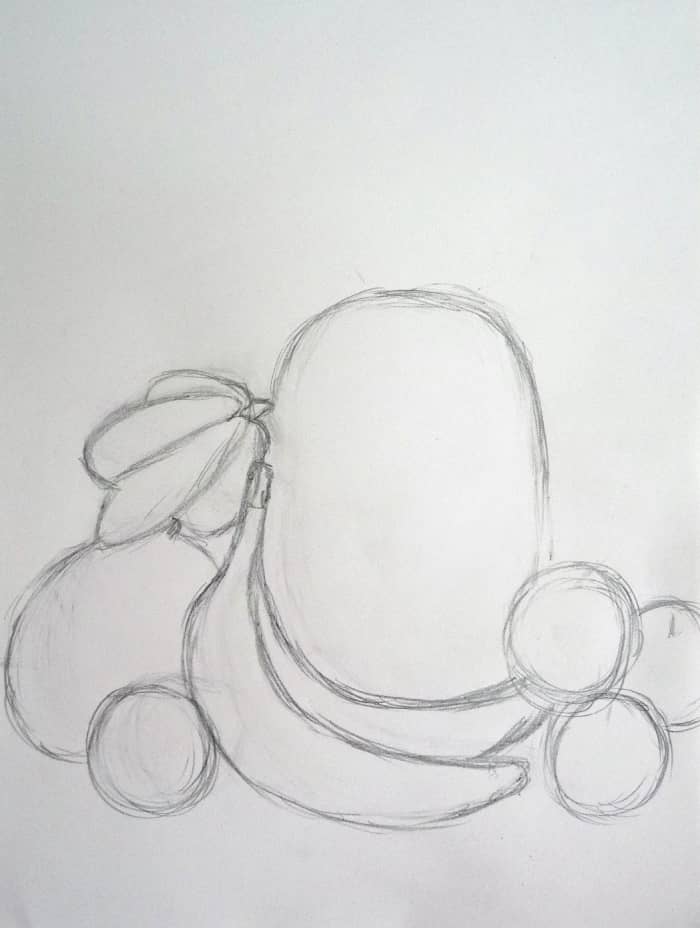
Sketch out all the basic shapes, centered nicely on your paper.
carolynkaye

carolynkaye
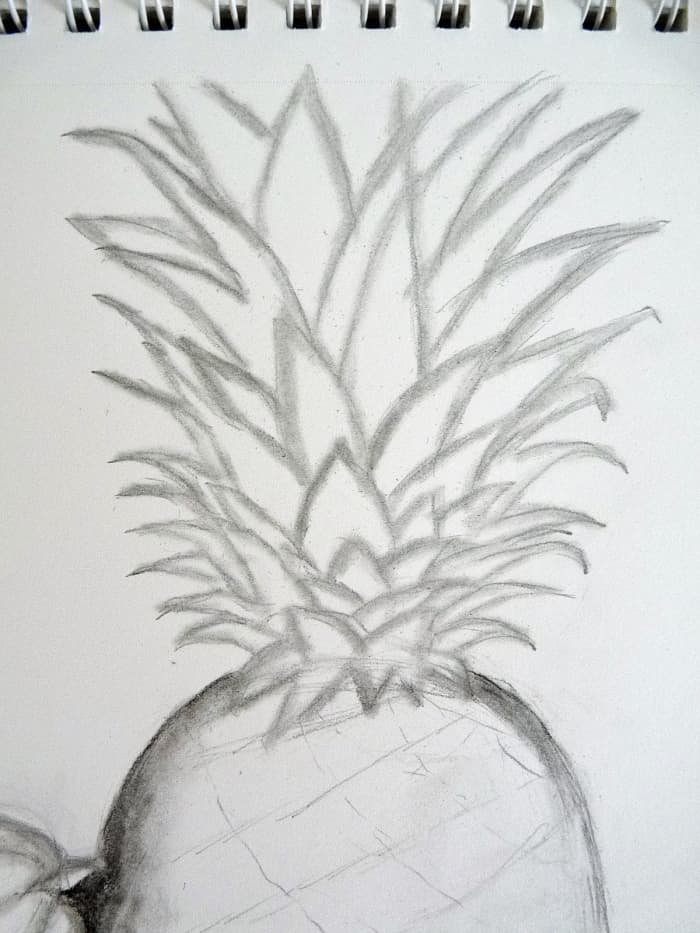
Step 2: Add Basic Details
After the shapes are drawn, continue to concentrate on the outline of the objects until you're happy with how they look on your paper.
Then, begin adding some basic details as I did with the pineapple skin and leaves, and the stems on the other pieces of fruit.
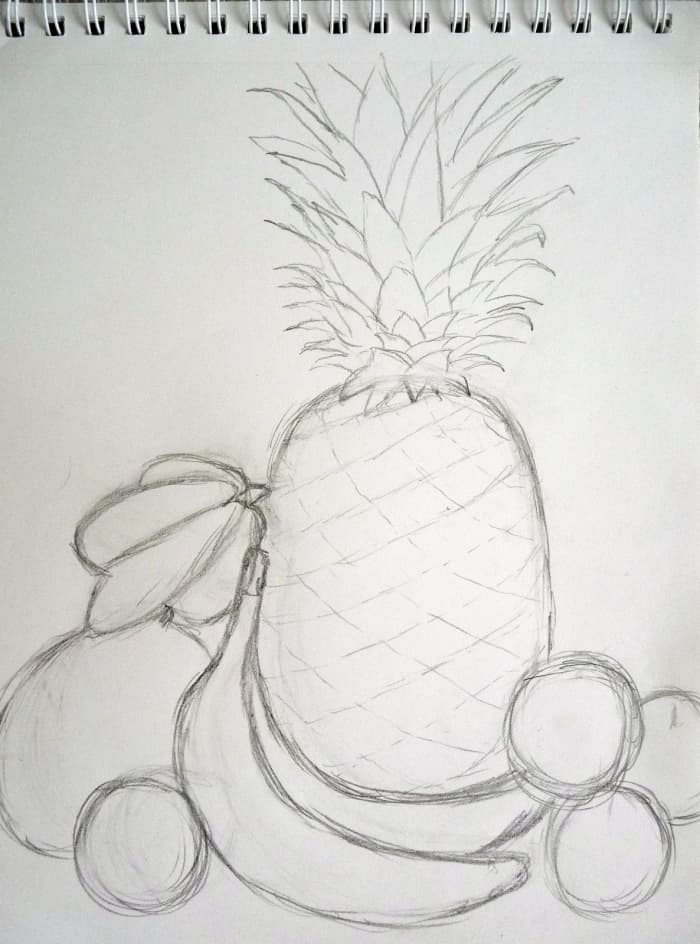
Begin adding some basic details as I did with the pineapple skin and leaves.
carolynkaye
Step 3: Clean Up With a Gum Eraser
Once your entire rough sketch is complete, use a gum eraser to gently clean up the lines of your sketch. Remove any smudges or fingerprints, too.
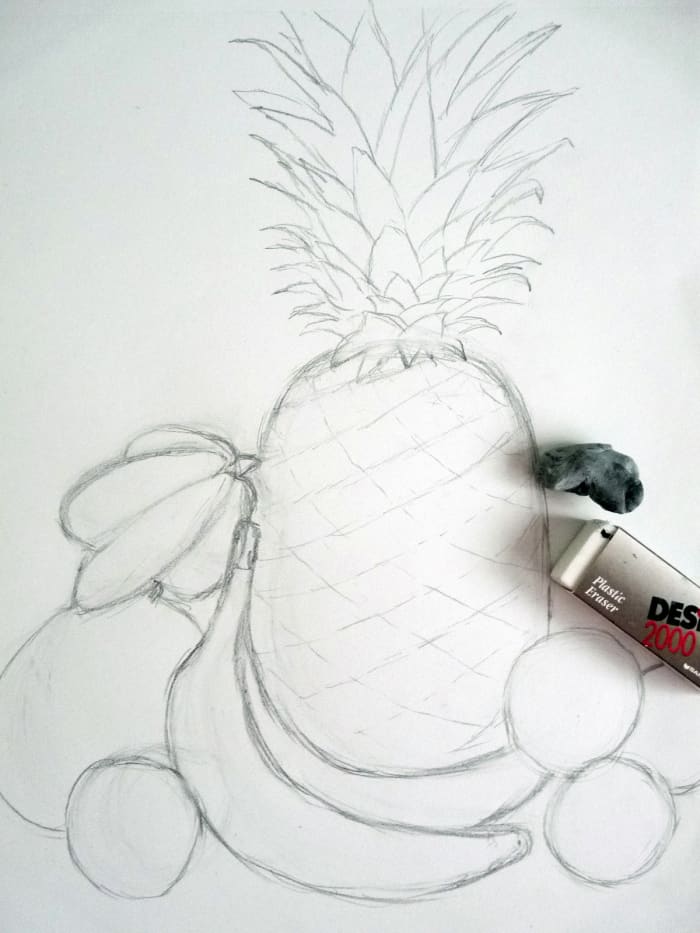
Use a gum eraser to gently clean up the lines of your sketch.
carolynkaye
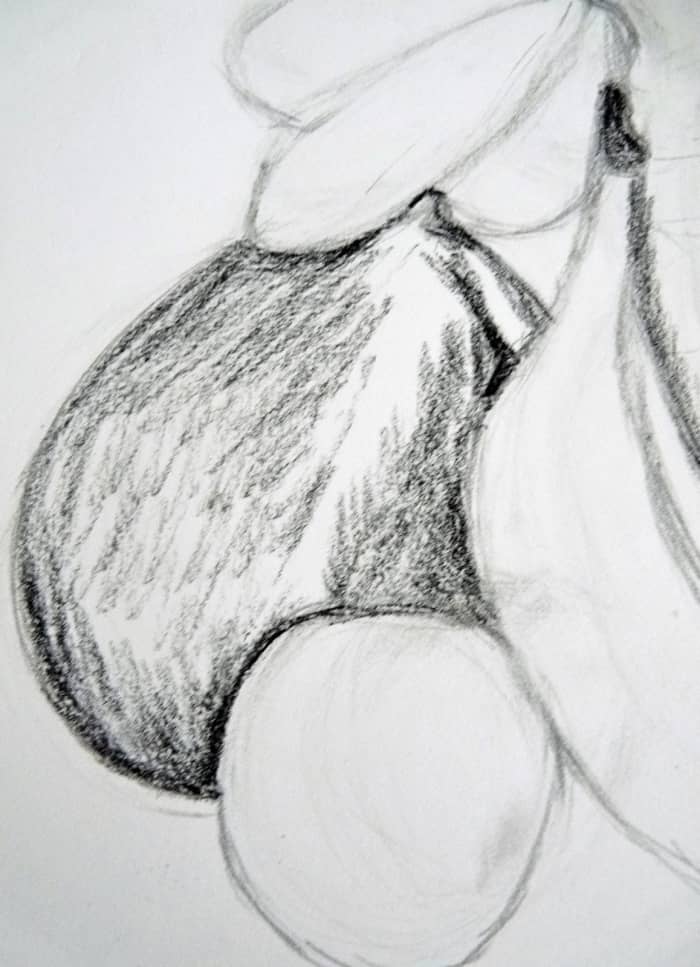
Step 4: Shade the Dark and Medium Tones
Look at your still life arrangement and notice where you see the darkest areas and shadows.
Use a soft pencil (like a 5B or 6B or a charcoal pencil) to begin darkening these places on your paper as I did with the mango in my sketch (see photos below).
carolynkaye
In the darkest areas near the bottom of the fruit, I used more pressure. In the middle and sides, I used much less pressure and more sparse strokes. In the places where the light hit the mango the strongest, I left white spaces.
Don't worry about getting the tones exactly right now. Just put in the basic shades because you'll come back to this later as you get closer to a finished sketch.
carolynkaye
Are You Right- or Left-Handed?
Work on objects on the left side of the page first if you're right-handed. This helps avoid smudging what you've completed. Work in the opposite direction if you're left-handed.
carolynkaye
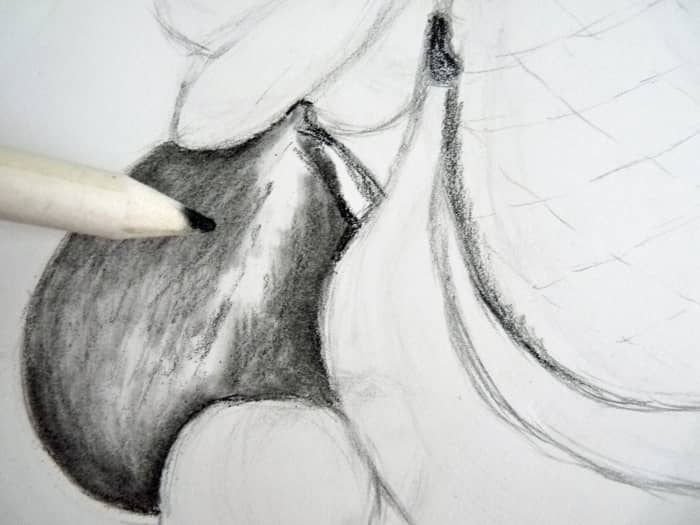
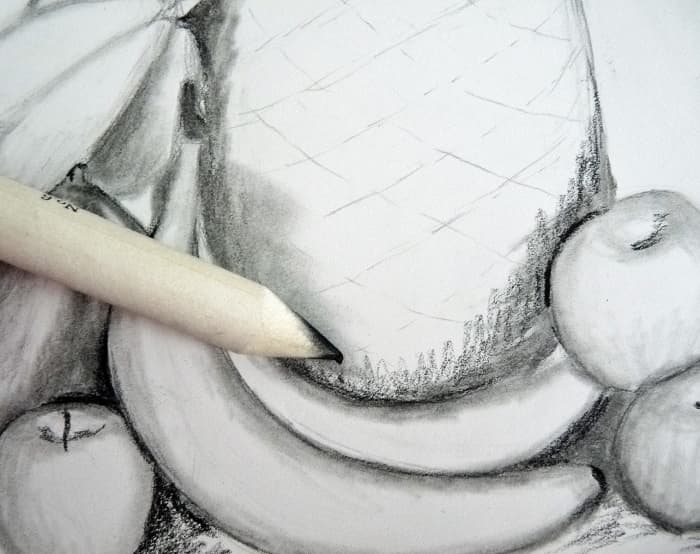
Step 5: Shade and Blend
Once you've added some dark and medium tones and shadows to your object, use a stump to gently blend and shade your pencil strokes to make the area look as close to the object you're sketching as possible.
Refer to your still life arrangement as much as you need. For larger areas, use the largest stump and for small spaces, use a tortillon.
How to Lighten Dark Shading
If you need to lighten an area that you shaded too much, use the gum eraser to remove some of the pencil. This is also a great technique for adding some highlights to an object.
Use the same shading and blending steps listed above on each of your objects, working left to right. (Or right to left)
Refer to your still life arrangement to capture the dark, medium and light tones of each object and the spaces between objects as accurately as possible.
Don't forget about the shadows the objects cast on and around the surface beneath them.
How much you blend with the stumps and tortillons is up to you. Some people like seeing distinct pencil or charcoal strokes, others like blending them to give their sketch a smoother look.
carolynkaye
carolynkaye
carolynkaye
carolynkaye
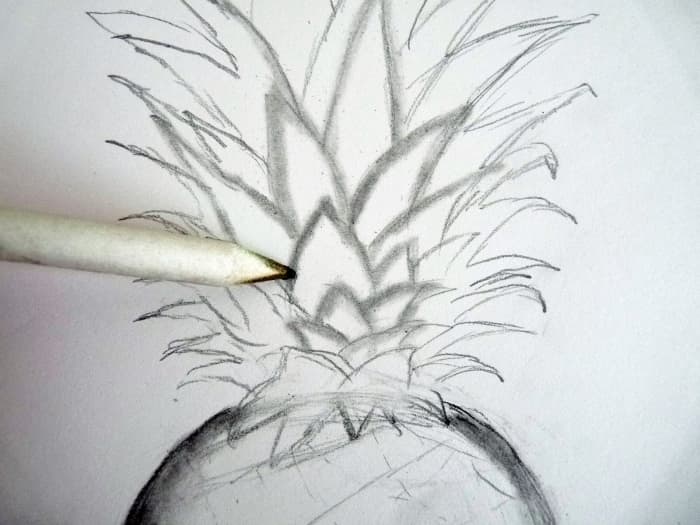
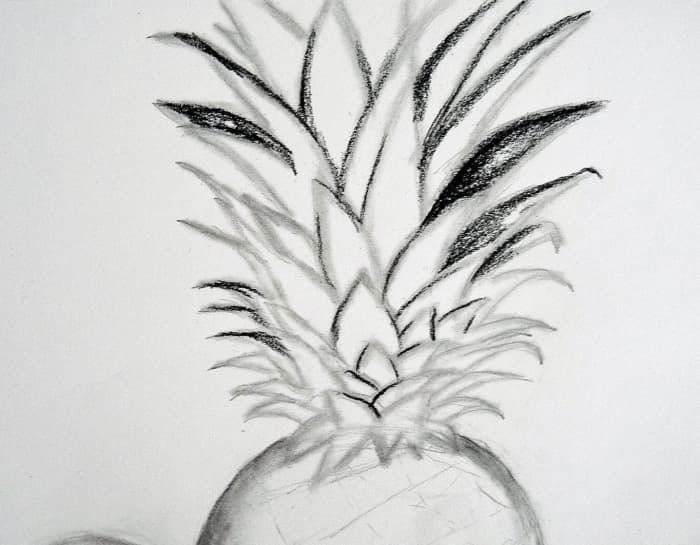
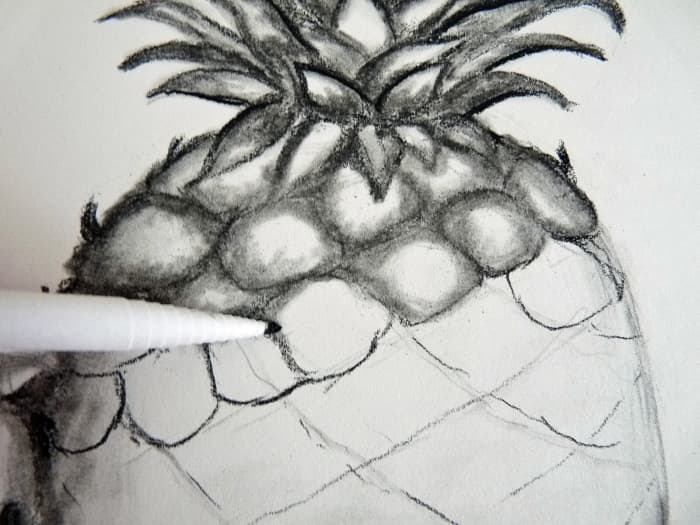
For the top of the pineapple, I sketched the leaves using a 3B pencil and then went over the lines with a stump.
carolynkaye
carolynkaye
To give the leaves dimension, I used a charcoal pencil to shade the darkest areas on the bottom of each leaf.
carolynkaye
Next, I began blending the charcoal areas with a stump to fill in the leaves, avoiding any areas where the light hit.
carolynkaye
carolynkaye
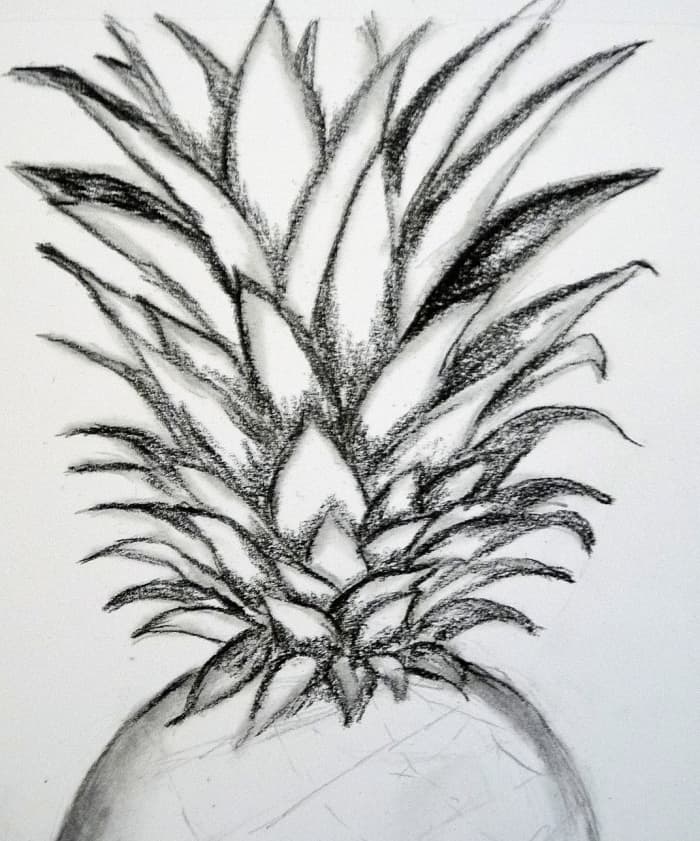
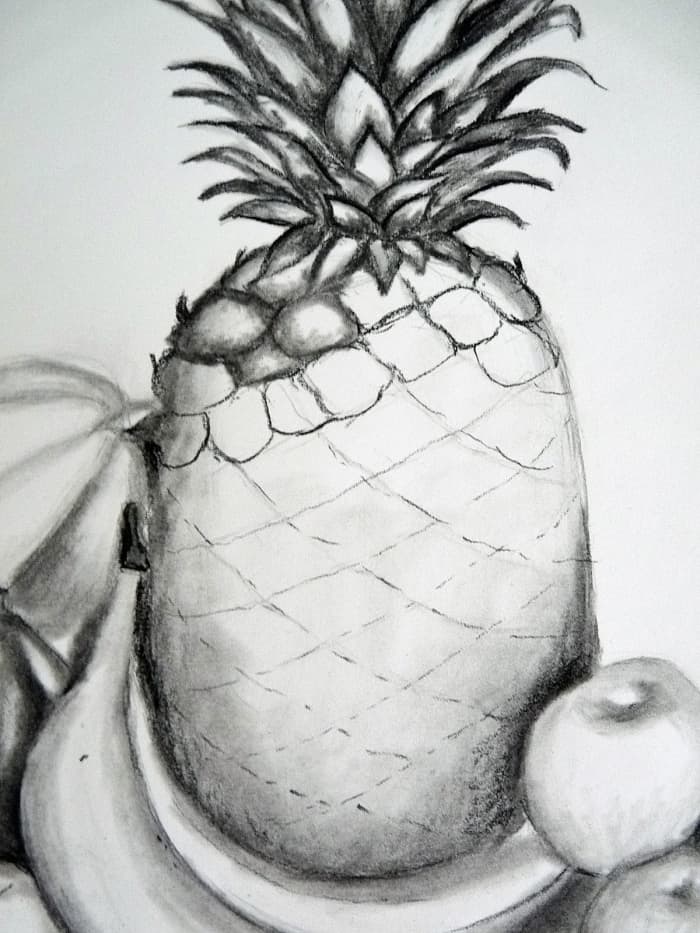
I used the same technique listed above on the pineapple skin to achieve its texture:
- Sketch the general criss-cross pattern of the skin with a pencil.
- Outline each circle with a charcoal pencil.
- Blend each circle with a stump, using lighter pressure toward the center.
carolynkaye
carolynkaye
carolynkaye
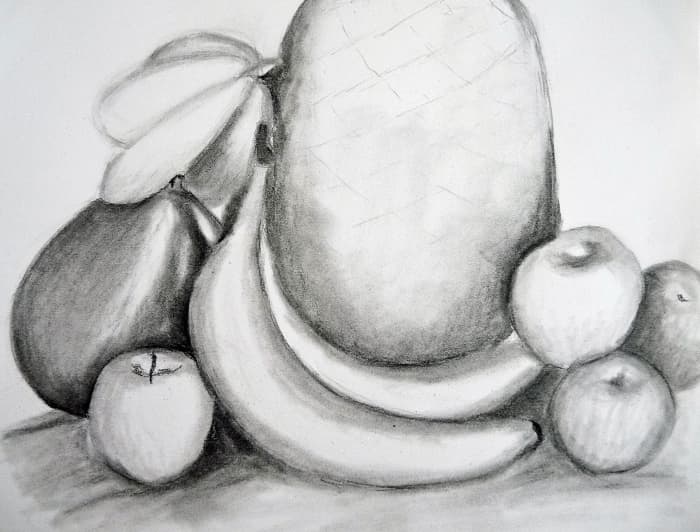
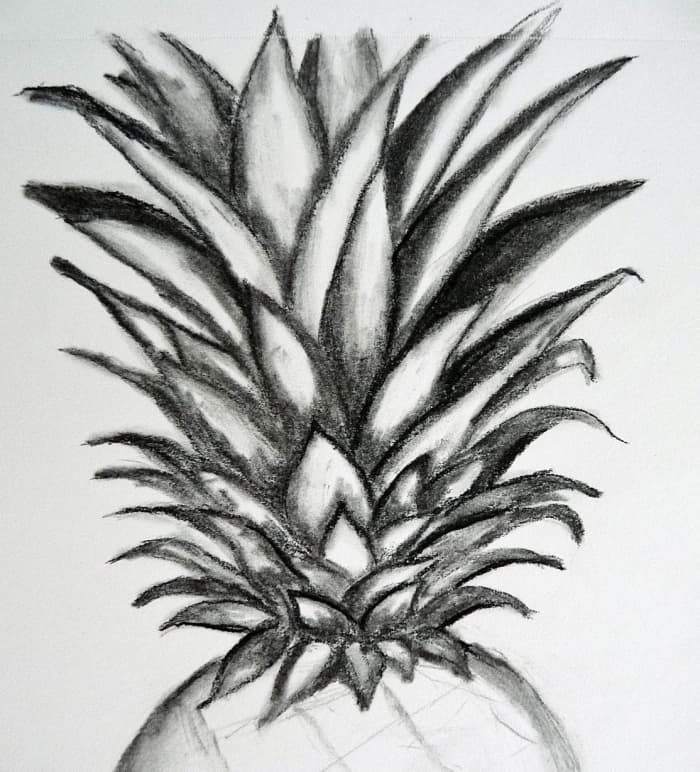
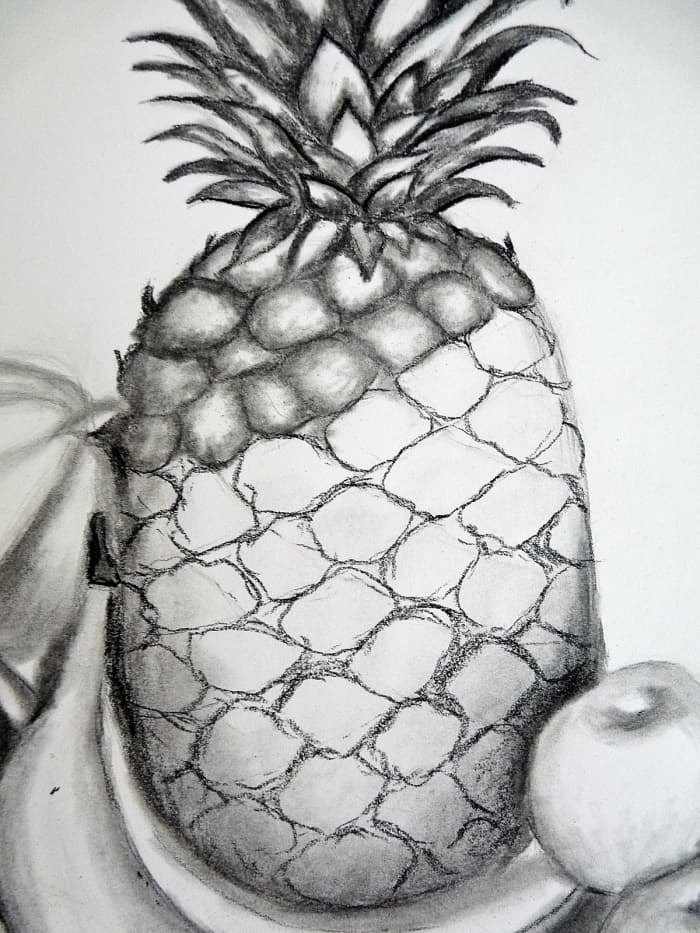
Step 6: Add Fine Details
Once the pineapple skin was fully shaded, I used an Ebony pencil to add additional detail to the pineapple, as well as to the rest of the fruit.
Small details like stems on the fruit and spots on the banana were added.
carolynkaye
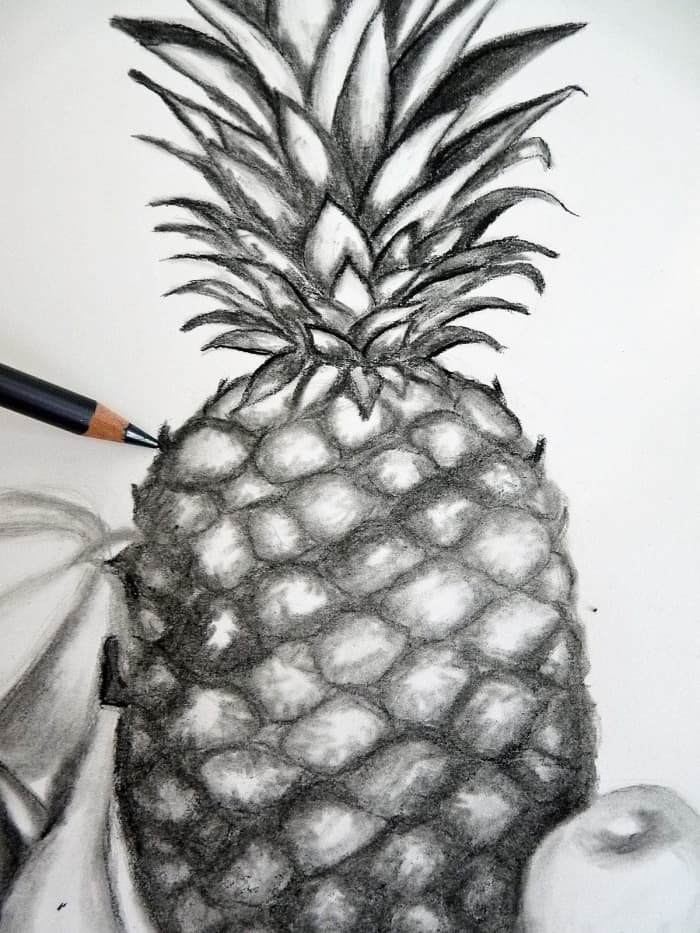
Step 7: Add the Final Touches
When you come close to finishing your sketch, take some time to look back and forth between your still life arrangement and your paper to see how accurate everything looks.
- You may find certain areas that need to be darker or lighter or additional details you need to add to bring your objects to life.
- There may be more shading or blending you need to do.
- Take your time and go object by object until you feel you've captured everything you can in your sketch.
- Use the gum eraser to remove any smudges on your paper.
carolynkaye
Step 8: Finish Up
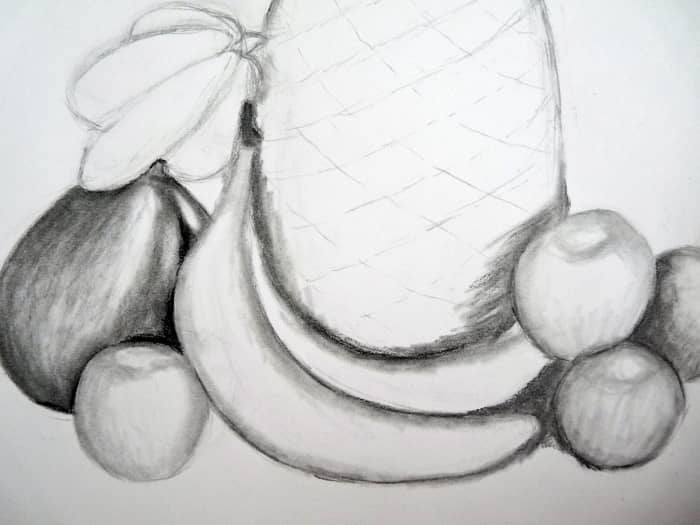
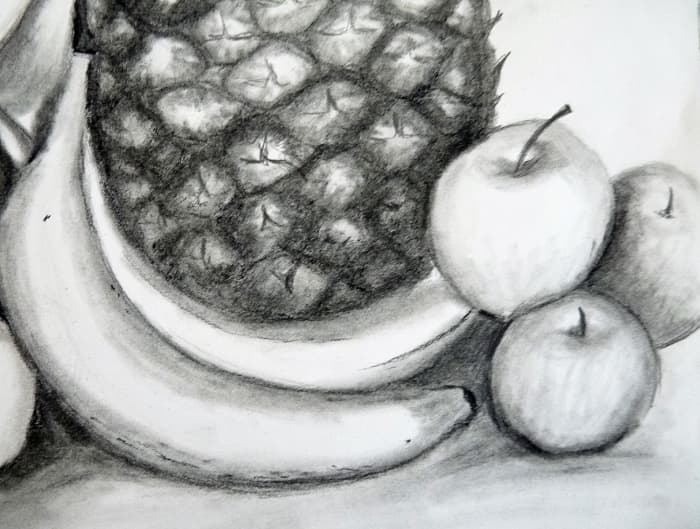
To finish my sketch, I darkened certain areas near the bottom of the fruit and in the spaces beneath using a charcoal pencil. Afterward, I blended these areas with a stump.
I used a gum eraser to highlight areas where the light hit the top of the bananas or other fruit. Highlights can help add realism to your drawing.
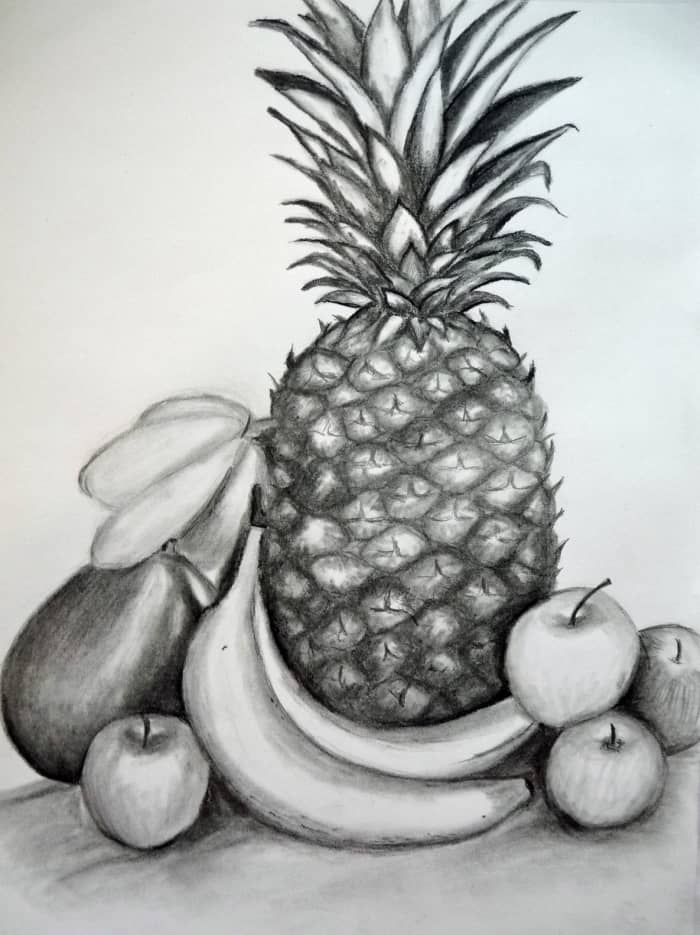
The completed sketch... Drawing a still life can be easier than you think.
carolynkaye
Side by side.
carolynkaye
Tips for Drawing Still Life
- If you're using a natural light source, work on your sketch around the same time each day so your lights, darks and shadows stay consistent.
- Use a flex-neck desk lamp to light your objects. Experiment to see how the light hits your objects from various angles.
- When you're ready to do a still life you plan to mat or frame, use Bristol board, which is a heavier, thicker paper available at art stores.
- When you've mastered pencil or charcoal, try drawing a still life in full color with either colored pencils or pastels.
- If you change your sketch after spraying it with a workable fixative, don't forget to re-spray it.
Questions & Answers
Question: Can I still shade like this without erasers and stumps?
Answer: Yes, you can. You can shade by just using your pencil and creating dark, light and in-between areas with your pencil strokes and varying degrees of pressure.
The pencil strokes will be more prominent and the objects won't have a "smooth" appearance if they're not blended, but this is one way to shade your sketch without the erasers and stumps.
If you don't have or don't want to use erasers and stumps and still want a smooth/blended appearance to your sketch, you can also blend objects using cotton balls, cotton swabs or small pieces of tissue. These can work well except with very small areas that need fine detail shading.
Question: Can I choose any subject for a still life drawing?
Answer: Yes, you can choose just about any subject for a still life.
© 2013 carolynkaye
Mohammad k on June 16, 2020:
Its a good work
RoadMonkey on May 05, 2020:
I must show this to my granddaughter. She has been practising drawing what she can see from her bedroom window during Coronavirus lockdown. Art is one area I cannot help her with but this hub would give her useful information.
Anshika dhirendra on May 04, 2020:
Good
carolynkaye (author) from USA on April 15, 2020:
Galaxia_YT: You're welcome. I'm glad it's helpful. Thanks for visiting!
carolynkaye (author) from USA on April 15, 2020:
Hello, That's a good question. Yes, still life drawing can be done in color. This is just one example of a way to do it.
Galaxia_YT on April 15, 2020:
Hi im doing this for my art class and thanks for making it step by step!
Can still life drawing be in color? on April 14, 2020:
I'm doing this for art class
carolynkaye (author) from USA on May 03, 2019:
Hello Vedant, I'm glad to hear your drawing turned out good. Thanks so much for your comments!
Vedant Khandelwal class 6 on May 02, 2019:
This is very use full to me I has made this by my own I has made this full drawing very nicely it looks very beautiful this is a wonderful site
carolynkaye (author) from USA on April 28, 2019:
You're welcome, Thomas. I'm glad you liked it. Thanks for your comments :)
Thomas on April 27, 2019:
Very stimulating and informative skills in drawing and composing still live.
Thank You.
Aaliya on April 06, 2019:
It's too complicated for me I can't do the banana part!D:
carolynkaye (author) from USA on February 25, 2019:
You're welcome. Thanks for your comments.
Sahil Khan from Delhi on February 25, 2019:
Thanks for this broo
carolynkaye (author) from USA on November 03, 2018:
Hello Poppy, Thanks so much for your kind words. I'm glad you like the article and plan to try some drawings. Yes, even with computers, there's something special about doing drawings with just a pencil. Good luck with your sketch, and thanks for taking the time to read my article :)
Poppy from Enoshima, Japan on November 02, 2018:
What a fantastic and detailed article! This brings back memories of drawing still-life in art class in high school. I always enjoyed it. Now it seems to be all about making drawings on a computer (if your goal is to sell them to make money), but I believe the charm of this style of drawing with pencil and paper will never die. I think you've inspired me to draw some things around my home. With this article, I can hopefully do a lot better than usual when it comes to shading.
Thanks again, and great work.
carolynkaye (author) from USA on July 15, 2018:
Thank you, Jashan. I appreciate your comment.
Jashan on July 15, 2018:
Very nice beautiful
carolynkaye (author) from USA on April 30, 2018:
You're welcome, Oliver. Thanks for your comments :)
oliver christiana on February 17, 2018:
Thanks i just did my assignment through this good job
carolynkaye (author) from USA on June 21, 2016:
Thanks, preetika bachchan :)
preetika bachchan on June 16, 2016:
outstanding....
carolynkaye (author) from USA on February 20, 2016:
Thank you, Marcia Julcilia :)
Marcia Julcilia on February 20, 2016:
Amazing
carolynkaye (author) from USA on February 03, 2016:
Hi Sarita, You're welcome and thanks so much :) I appreciate your comment! -Carolyn
sarita from Hisar on February 03, 2016:
You have a wonderful hub. I am a lover of pencil sketching. Thank you for sharing..
carolynkaye (author) from USA on November 27, 2015:
Hello aesta1! Thank you, I appreciate your feedback :-)
Mary Norton from Ontario, Canada on November 21, 2015:
Thanks for taking the trouble of posting photos of the steps to take. They are more instructional.
carolynkaye (author) from USA on June 19, 2015:
Thanks, Heather :)
Heather Gilmour from London on June 19, 2015:
WOW, this is amazing! The fruits look so realistic and the step by step tutorial you made is so good.
Melissa Reese Etheridge from Tennessee, United States on May 01, 2015:
This is a fantastic Hub. I may give it a try this weekend.
carolynkaye (author) from USA on March 12, 2015:
Thanks for letting me know Shyron. It doesn't look there's any type of contact link so I'm not sure what I can do...
Shyron E Shenko from Texas on March 11, 2015:
Carolyn, this hub is stolen and put up on a dating site using my name, and if you go to the site and click on the hub title it takes you to something else.
bwin368.net/search/shyron-e-shenko-on-hubpages
carolynkaye (author) from USA on February 07, 2015:
Thanks for the feedback, Kappygirl :) I'd love to hear how it turns out.
Kappygirl on February 07, 2015:
This was excellent! I have always wanted to take a drawing class. This is like having your own personal instructor :) I hope to try out these techniques soon. Thank you so much for sharing. Everything was clear and easy to understand. I just hope mine turns out like the example!
carolynkaye (author) from USA on February 06, 2015:
RTalloni, mary615, DreamerMeg, poetryman6969, MHiggins, techygran, Suman Miah, FlowerCS….Thank you all so much for your nice comments :) I'm glad to hear people enjoyed this Hub.
Lindsey A S from Delaware on February 06, 2015:
I really enjoyed the picture! This was a great choice as well as a great drawling I really liked this hub. I myself am great at many forms of art so i got so into this! I always strive to learn new things and improve on drawling etc. Great job!
Suman from Bangladesh on February 05, 2015:
Thanks, I learned a lot
Cynthia Zirkwitz from Vancouver Island, Canada on February 05, 2015:
Carolynkaye:
Congratulations for the HOTD! You did a stellar presentation of how to draw a still life. I thought I knew something about it, but obviously that class back in 5th grade, 50+ years ago, wasn't enough lol. Stumps and tortillions are entirely new to me, and I watched my mother do charcoals and pastels. Live and Learn! Thank you for the motivational piece! ~Cynthia
Michael Higgins from Michigan on February 05, 2015:
Great hub! Very interesting and well written. Thanks for all of the great info and congrats on HOTD!
poetryman6969 on February 05, 2015:
As the bard, Clint Eastwood once said: A man's gotta know his limitations. At least the fruit can't run away when I draw. As I recall men ran away, or tried to whenever Clint Eastwood would draw.
Still nice hub and good info!
DreamerMeg from Northern Ireland on February 05, 2015:
I have never done art but I can see how to try it out from your Hub, if I want to. Very interesting.
Mary Hyatt from Florida on February 05, 2015:
Congrats on HOTD! I wish I could draw still life like this. I just need to practice more, I guess.
Great Hub wish wonderful photos to explain how you draw like this.
RTalloni on February 05, 2015:
Just stopping back in to say congrats on your Hub of the Day award for this tutorial. It still makes me want to stop everything and go spend time drawing! :)
carolynkaye (author) from USA on February 05, 2015:
@supercibor, @Robie Benve, @SusanDeppner, @Madelline, @Al-Lyn, @Lefty Jay, @colorfulone, @mySuccess8, @Peggasuse, @Peggy W, @swilliams, @Thelma Alberts and anyone else I missed...
Thank you all for your comments on the HOTD. I really appreciate them all! It was a fun Hub to put together. I love still life drawings because each one is a brand new challenge and learning experience even for those not new to art.
Thelma Alberts from Germany on February 05, 2015:
Congratulations on the HOTD award. A very deserving hub. I can´t draw but my hubby is an artist. He draws and paints mostly portraits. Some are landscapes and still life compositions.
swilliams on February 05, 2015:
You did an amazing job! I have a love for art! My family members are amazing artist, however I think that talent may have passed me up, however when I see articles such as this one it gives me hope! Voted up, and Tweeted out! Thanks!
Peggy Woods from Houston, Texas on February 05, 2015:
This hub certainly deserved a HOTD accolade. Well done with your explanations and step by step photos. You certainly explained how to draw and shade still life objects well. Happy to share this! :)
Peggasuse from Indiana, USA on February 05, 2015:
Great Hub! I'm going to send the link to my grandson, to do as an art project :)
mySuccess8 on February 05, 2015:
This is an excellent step-by-step drawing tutorial, supported by clear photographs. Pineapples, to someone who is not an artist, is a difficult object to draw, but you made it look so real. Congrats on Hub of the Day!
Susie Lehto from Minnesota on February 05, 2015:
Congratulations on Hub of the Day! I truly enjoyed your how to hub.
Chris Powell from Atlanta, GA on February 05, 2015:
Very excellent tutorial, I remember doing a still painting back in high school; had this info been around that time, I could have used a lot of the tips and pointers from this hub!
Allen Neims and Lynn Raynor on February 05, 2015:
What a great tutorial. The amount of detail you went into is very helpful and rarely done in other tutorials.
madelline MSW from Vancouver, BC on February 05, 2015:
I just started reading your awesome post! Thanks for this series on sketching and painting, although I have no natural gift for it , I found it a great pleasure and pastime working with paints since I've been semi-retired. Your pages will be a great help.
Susan Deppner from Arkansas USA on February 05, 2015:
Wow, what a great tutorial! Very deserving of Hub of the Day. Congratulations!
Robie Benve from Ohio on February 05, 2015:
Excellent hub! So glad to see an artistic subject picked as HOD and yours really deserves it! Great job!
Voted up, useful, and pinned. :)
Hector Herrera from Dominican Republic on February 05, 2015:
Thanks for the great hub. I used to draw and now you have inspired me to go back and get my pencils and enjoy this great art.
carolynkaye (author) from USA on February 05, 2015:
Thanks, CharlieClaywell. Yes, taking a photo and working from that is a great way too because you don't have to worry about differences in light throughout the day. It can be difficult to do a large drawing from a small photo, so if you can print the photo in at least an 8x10" or put the photo full size on your computer screen, that makes it easier.
carolynkaye (author) from USA on February 05, 2015:
I'm glad you liked the Hub, pstraubie48. Thank you so much for your comments :)
carolynkaye (author) from USA on February 05, 2015:
Thank you, JCielo!
Charlie Claywell on February 05, 2015:
Thanks for the step-by-step informative hub. I have always enjoyed pencil/pen art and have tried my hand at it a few times. I finally have a small room where I can set up objects for a drawing. I've also thought about taking a photograph of the set-up and drawing from that, although I'm not sure if it would be easier or harder than way?
Great hub!
Patricia Scott from North Central Florida on February 05, 2015:
Congrats on HOTD. If a hub has ever deserved it, this one does.
Your explanations and illustrations are so helpful.
As for me, I can marvel at your work but alas my pineapple will ever remain a sort of melting oval on the canvas.....
My art is only accomplished with words...what a gift you have bave an artist's eye and be able to translate it into a finished beauty.
Angels are on the way to you ps
JCielo from England on February 05, 2015:
I used to love drawing and doing water colours. But that was years ago. You've inspired me to start again! Top class hub and really deserving of Hub of the Day. Congratulations!
carolynkaye (author) from USA on December 01, 2014:
Thanks for the comment, peachpurple. Apples take practice to get right. It's hard to get that 'shine' with just a pencil. I use an gum eraser to make highlights and that helps bring it to life.
Hi Georgina_writes. Thanks much, I'm glad you liked the Hub :) I appreciate the comments.
Georgina Crawford from Dartmoor on December 01, 2014:
I really enjoyed your hub, your instruction was so clear. Good to meet a fellow artist. Following you. I loved the finished piece!
peachy from Home Sweet Home on November 29, 2014:
my teacher used to teach us how to draw apples and i never got right with the shadings
carolynkaye (author) from USA on October 01, 2014:
Thanks for the comments, billycamryn and Kingslayercrow :)
Kingslayercrow on October 01, 2014:
Great tutorial, I'll use this guide next time I do a still life.
carolynkaye (author) from USA on July 17, 2014:
Thank you, mahnoorzafarkhan :)
mahnoorzafarkhan on July 17, 2014:
love it
Tolovaj on February 23, 2014:
I am always impressed how much can be done with shading. Beautifully done!
Margo Arrowsmith on November 17, 2013:
I once attended a self portrait class, that used a similar method, this works! Mine wasn't half bad, oh heck, I like mine!
Ana Maria Orantes from Miami Florida on November 15, 2013:
Miss. carolynkaye. I love your article. You did a beautiful job. congratulations to you for all the good work.
mariewj on November 15, 2013:
What a fantastic drawing and I loved seeing all your step by step photos on how you achieved that. I haven't done any real pencil art since college but I'd like to get back into it at some point.
carolynkaye (author) from USA on November 13, 2013:
Hi sprickita... Thanks for sharing those tips! I will have to try them next time. I appreciate your comments :)
sprickita from Reno on November 13, 2013:
If your working on a really tight budget iv found baby oil over finished work gives it a nice soft set tone and tear a sheet of paper in half,roll it diagonally, wrap with masking tape then rip off the tip is an inexpensive shading tool... Thanks for the great hub with tons of step by step pics loved it! 8-)
carolynkaye (author) from USA on November 12, 2013:
@ Hugo Furst - I'm glad you found it helpful. Thanks for the feedback an vote :)
Hugo Furst from Australia on November 12, 2013:
This is something I've always wanted to try. Thanks for writing this hub and filling it with great tips! Voted up :)
carolynkaye (author) from USA on November 12, 2013:
Hi Hezekiah. Thanks for your comments :)
Hezekiah from Japan on November 12, 2013:
Excellent tutorial there, drawing is one of my weakest skills, but using info like this I should be able to draw something my daughter doesn't laugh at and recognizes straight away without having to guess.
carolynkaye (author) from USA on November 10, 2013:
@ loveofnight - I'm glad to hear that. Thanks! I'd love to hear how it turns out :)
Loveofnight Anderson from Baltimore, Maryland on November 10, 2013:
it's not just useful and interesting but helpful as well. unfortunately there was no helpful button. i really love this hub and do intend on using all of the steps and tips that you have given me. well done and thanks much, happy hubbing.
carolynkaye (author) from USA on November 09, 2013:
@ Prithima Sharma -- Thank you!
carolynkaye (author) from USA on November 09, 2013:
@ Tom Schumacher - I appreciate your comments :-) Thank you!
carolynkaye (author) from USA on November 09, 2013:
Thanks for the comment & votes, Crystal :)
Prithima Sharma from Delhi, India on November 08, 2013:
Superb hub, like the pics most.
Tom Schumacher from Huntington Beach, CA on November 08, 2013:
Excellent hub! Information you revealed about the process of creating still life compositions, including recommended materials, is useful for beginning artists. Vote up!
Crystal Tatum from Georgia on November 08, 2013:
A great hub! Alas, I am no artist. Should have taken those painting classes when my mom offered to pay. voted up and sharing.
carolynkaye (author) from USA on November 08, 2013:
Thanks for the comments, FullOfLoveSites!
carolynkaye (author) from USA on November 08, 2013:
Thanks much, Paul. I appreciate the feedback :-) This was a fun Hub to put together.
carolynkaye (author) from USA on November 08, 2013:
Thanks, Prithima Sharma :)
FullOfLoveSites from United States on November 08, 2013:
Nice one! Outline first before all the details, it looks like I wanna buy a sketch pad myself start drawing! It's a good start to sketch first before you learn to paint. Thanks for posting. :)
Paul Edmondson from Burlingame, CA on November 08, 2013:
You've done an amazing job with this. It makes me so happy and gives me energy when I see amazing hubs like this. Thank you (and thanks to GlimmerTwinFan for sharing:)
Prithima Sharma from Delhi, India on November 08, 2013:
hmm gud one
carolynkaye (author) from USA on November 08, 2013:
Thanks, ChristinS :-) Glad you liked the Hub! Thanx for your comments, vote, pinning :)
carolynkaye (author) from USA on November 08, 2013:
Thanks for your comments, RTalloni! Much appreciated :-)
carolynkaye (author) from USA on November 08, 2013:
Thanks, erinshelby :)
Christin Sander from Midwest on November 08, 2013:
What an excellent and detailed hub, makes me want to go dig out my old pencils again :) voted and pinning
RTalloni on November 08, 2013:
Encouraging others to draw is good stuff. I always find that those who say they can't are happily surprised at how they feel about it if they will just start.
Guiding others in drawing is even better stuff. This is a neat tutorial and I'm pinning, sharing, etc.
I enjoyed this very much for it has made me want to take time for an activity that I love, but too often put off for other things.
erinshelby from United States on November 08, 2013:
Nice intro for folks with an interest in this. Good step-by-step photos.
How to Draw a Mango for Kids Step by Step
Source: https://feltmagnet.com/drawing/How-To-Draw-a-Still-Life-Composition